

This is the best control deck in constructed Epic, currently. It consists of some of the most overwhelming individual swing/win cards cards in the game, a Scara’s Gift card draw engine that bridges you to them, and your “Or”s that are either. The deck is vulnerable in the early game while it draws up to seven and gathers its key cards.
I’m going to start by going over the cards individually, then I’m going to preview the “Absorb then Unleash” playstyle (as opposed to Get Ahead, Stay Ahead) and how it relates to this deck. (Eventually, I plan on writing a full article on the “Absorb then Unleash” playstyle where I fully describe it and break it down by looking at multiple historical decks that have utilized it: Derek Arnold’s 4 Color Control, Tom Dixon’s Soul Hunter Control, Gabe Costa-Giomi’s/Nashville’s Combo Kark, and this deck pioneered by John Tatian with “The Flock” and successfully tweaked by Nathan Overbay with “The Lads.” The Lad’s Gift Horse Postmortem link)
Scara’s Gift

Scara’s Gift is the defining card of this deck. It warps the deck’s construction around itself in order to provide both survival and an  unremitting win condition. Once you draw this 0-cost card, you’re effectively guaranteed a Flame Strike-equivalent-health-swing (-4 health for your opponent/+4 health for you, assuming one recall). More importantly though, as long as you can keep recalling it, Scara’s Gift upgrades every 1-cost Evil card in your deck. Most importantly, it turns all of your 1-cost Evil “Draw 2″s into “Draw 2 And”s. This is the edge that makes this control deck better than the others.
 In Epic, control decks have typically been a combination of the best cards (Sea Titan/Angel of Death, Drain Essence, Wave of Transformation/Zombie Apocalypse, etc.) and “Draw 2″s to bridge you between them (Ancient Chant, Lesson Learned, etc.). Control’s weakness has historically been decks that could punish them for using a gold just to draw 2 cards. Usually this was Midrange decks that could keep a constant stream of threats coming without taking a gold break just to draw cards, but an aggro deck could also take games if the control deck drew too many “Draw 2″s early and not enough strong cards (namely Drain Essence).
 With Scara’s Gift, Midrange loses its ability to grind the control deck out of the game…which is a very weird and counter-intuitive sentence. If Gift is drawn, the control deck is able to chip away at the Midrange deck/bolster its own health, while deflecting the Midrange deck as it hammers away looking for big damage openings. Without Gift, control decks generally fumble at some point, allowing Midrange to run them over. With Gift, this control deck has a health buffer to survive that fumble, and the inevitability to kill the Midrange deck before too many more happen. Against Aggro, Gift can get you just out of range of that last Flame Strike, but if the aggro deck is fast enough, Gift won’t have much time to matter (your other control cards are much more important for those matchups).
In exchange for these strengths, you want minimal effects that interact with your discard pile (recycle, Necromancer Lord/Lesson Learned, etc.), you want a lot of cards to enter your discard pile, you want a lot of card draw to find/fuel Gift, and you need 1-cost Evil cards to trigger its recall (0-cost Evil cards like Heinous Feast don’t trigger recall).
Card Draw Engine


These are the cards that find/fuel your Scara’s Gifts. Ancient Chant and Erase are just solid “Draw 2 And”s, great for the early game before you find Gift. Dirge of Scara and The Gudgeon are similar “Draw 2 And”s, but their ability to trigger Gift turns them into “Draw 2 And And”s. (Chant/Dirge’s “When this card leaves your discard pile” effects can also be triggered when banishing cards with Gift.) The rest of Dark One’s Fury, Scara’s Will, Demonic Rising, and Zombie Apocalypse are all solid Gift-recalling “Or Draw 2″s that double as overwhelming swing/win cards. All the leftovers are filler that can draw if needed.
Swing/Win Cards


Even considering all of the limitations/requirements we’ve forced onto ourselves to gain access to the power of Gift, it is arguably not even the best card in the deck (feel free to argue with me in the comments). These are all of the cards that actively win you the game and/or keep you from losing.
 Zannos Corpse Lord, this is the strongest card in the deck. It does almost everything better than every other slow 1-cost card. Assuming Loyalty 4 (although it is certainly possible to get twice that in a game):
- It has more stats (17/17) than every other playable card in the game, and it comes as a strong distribution of bodies for both defense and offense.
- For defense, you get 4 chump blockers that can halt big, non-breakthrough champions for 2+ attack cycles, and a final 9/9 bulwark that can’t be incidentally removed along with the tokens. This buys you time to draw cards to find your Gift and/or other critical cards for the matchup. Further, it can force your opponent to commit more resources to the board to get past your defenses and kill you/punish your card draw. However, their extra commitment makes you board clears oh so much better.
- For offense, you get 4 chump attackers that can chip away at your opponent’s health, and a 9/9 that threatens to take a bigger chunk if they use all of their blockers on your tokens. The flexibility to push forward or hold back blockers is both powerful and skill-testing.
- It comes with it’s own Flame Strike-equivalent-health-swing which, along with its stats distribution, means no single card can 1-for-1 with it and come out ahead (except for a 9 loyalty Scarros).
- The only single card that can reliably 1-sided clear your Zannos board is Hurricane and that doesn’t negate the Flame Strike swing. Zannos, at 9 defense, survives all other AoE damage-based board clears (namely Flames of Furios, Draka’s Fire, and most Scarros reveals). Further, since it is a mix of 0-cost tokens and a 1-cost body, Quell/Inheritance of the Meek effects don’t work, nor does the one alignment based board clear, Dark One’s Fury. Worst of all, however, are the bounce-based clears.
- Usually an incredible option against tokens, an opponent bouncing your Zannos-based board is horrendous, for them. Not only can you just completely rebuild your overwhelming board on your next turn, but you also regain some of the health you might have lost in the interim, you directly push your opponent ever closer to death, and you might have drawn another Evil card for an even bigger loyalty reveal.
- Best case scenario for your opponent is Draka, Dragon Tyrant with a Feeding Frenzy or triggered Smash and Burn.
The biggest drawback of running Scara’s Gift is that it makes Zannos-specific discard pile recursion effects significantly less reliable (Necromancer Lord, Final Task, etc.).
 Rift Summoner is Zannos’ off-turn bash brother. At 13/13, it has even more stats than the vanilla ambush champion Lurking Giant, and all other ambush champions too. Rift Summoner along with Zannos demonstrates how even though you are a control deck, you can still beat the crap out of your opponent in combat.
Aside from being one of the best off-turn punishers in the game, on the same level as Thought Plucker (if not higher), it can continue to snowball on its own. Similar to Zannos, it comes with chump blockers/attackers. However, after one of your demons blocks or is blocked by a bigger champion, Rift Summoner can expend to break the doomed token to give you two new ones. It is a must answer threat, but at least it is significantly easier to wipe off the board at only 5 defense and it has no unpreventable, immediate value.
 Dark One’s Fury is the third major piece of the offensive side of this deck. Outside of the Evil mirror match (where it’s just a 1-cost Evil draw 2), this is always a one-sided board clear. While clearly strong as a defensive tool, where it really shines is to clear out blockers for your Rift Summoner and/or Zannos fueled army, particularly if your opponent spends their gold first on your turn. For example, if you ambush Rift Summoner into play on your opponent’s turn when their gold is down, you can then turn around on your turn, remove all of their threats, and immediately threaten 13 damage. Just the presence of this card in your deck makes it more likely that your opponent will be forced to hold their gold on your turn, allowing your chip damage to go through uncontested. It’s also a 1-cost Evil “Or Draw 2.”
 Demonic Rising is another powerful way to close out games. If you have more champions in play than your opponent and they spend their gold first, you can make any reasonable attacks and then follow up with this to get a bunch more blitzing demons to finish the job. It functions as a strong off-turn board clear too, downgrading your opponent’s champions while likely upgrading yours. It’s a 1-cost Evil “Or Draw 2” as well.
 Steed of Zaltessa is the final aggressive card to beat down your opponent. While it can only be used on-turn, it deals the same amount of damage as Strafing Dragon while also getting over the 6 defense, Smash and Burn, breakpoint (in addition to the common 6-offense airborne champion breakpoint). Further, it’s strong against two of the most common off-turn answers for blitzing champions: Drain Essence and Erase/Hasty Retreat. It prevents health gain which means playing it into a waiting Drain Essence net gains 5 damage to your opponent while neutralizing their gold for that turn, and playing it into Erase trades a net gain of 5 damage to your opponent (while maintaning a Steed in hand to do 5 more later) for them getting +1 card in hand.
When you get Gift going, your opponent will frequently be forced to spend their gold before you, and this can speed up your clock on them significantly. Personally, I think it is incredibly greedy to be running two of these in this deck though, since drawing them both early seems terrible. That being said, seeing as the name of the “The Lads” version of this deck is called “Gift Horse,” I’m guessing it performed very well for them in testing.
 Angel of Death is the start of the overwhelming defensive cards. First off, it is a board clear, which is a strong 1-gold way to neutralize multiple golds spent by your opponent. The more you can force your opponent to commit to the board before you pull the trigger (such as with chump blocking), the more value you get. This is an amazing answer to Brachiosaurus(es).
Post board clear it is an evasive 6 attack threat with more than 3 defense to dodge most of the played 0-cost removal. Therefore, it will generally require a gold, or at least a gold-triggered Smash and Burn to remove. While strong as a threat that creates its own open board, it is easy to underestimate just how powerful that body is as an airborne chump blocker.
In my testing, there were countless times where in response to an Angel of Death, I would play an off-turn gold punisher. Then on my turn, having no 0-cost way to remove Angel of Death as a chump blocker for all but unblockable champions, I’d attack into it, get blocked, and then either have my champion finished off with a 0-cost Wither effect or have to debate between potentially overextending or passing (effectively forfeiting my turn). If I chose to pass, it’d cost me a chance to do combat damage to my opponent, draw them a card, and give them a relatively safe turn to either draw more cards or develop their own board. This card stonewalled me on so many occasions with so many decks, and it is the main reason to consider running Lightning Strike, possibly another reason to run Spike Trap. It is a deceptively powerful card, which is another weird statement seeing as it is seen as clearly quite powerful.
 Raxxa’s Curse pushes out almost all 0-cost champions from the meta, particularly ones without an immediate impact (similar to what Smash and Burn does to most 6 or less defense champions). It’s a 0-cost card that removes an opponent’s slight board advantage and gives you one, absurdly powerful. It can also draw 2 if needed, but it does not trigger Gift recall.
 Scara’s Will is a way to break an opponent’s single big champion without committing your gold for the turn. You can then either follow up by passing with your second Evil gold up, playing a threat like Zannos, or drawing cards. Early game, drawing cards is generally best, although passing to prevent your opponent from establishing off-turn has merits as well. Late game, drop that Zannos.
This is also nice because it can trigger Gift twice, and it gets an extra card in your discard pile to feed Gift’s recall. It’s another 1-cost Evil “Or Draw 2” too.
 Wither, not only is it a great way to break Muse and most other 0-cost champions, but it’s ability to clear off all opposing tokens of a single type for 0, is devastating. It can answer Zombie tokens in the mirror, and it can even neutralize Insurgency combo kills. Wither can also be used preemptively as a combat trick or as a follow up to guaranteed finish off damaged champions. Overall it is just a versatile 0-cost answer and another card to fuel Gift’s banishing.
Drain Essence is one of Epic’s most played constructed cards. Gain 9 health is a lot, buying you time to get rolling, and 9 damage importantly breaks almost all champions in the air that you can’t easily chump block.
Zombie Apocalypse is another 1-cost Evil “Or Draw 2” or a desperation off-turn board clear. Unfortunately, since you will be burning through your discard pile, you generally won’t end up ahead on board after playing it, but you can Wither/Angel of Death away the tokens if needed.
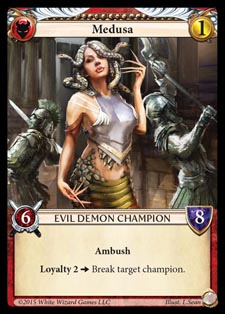
 I had always thought Medusa was the must-include Loyalty 2 card of Evil, similar to Raging T-Rex for Wild. However, it actually seems to be the weakest card in the deck (which is certainly in large part due to the power level of the rest of the cards). For example, in the mirror match up, what are you trying to hit with it? Maybe Angel of Death or their Medusa, but that is about it. Then, it is a non-evasive mid-size body that loses to Zannos, ties to another Medusa, and can get chump blocked for days, kinda worthless.
Against Midrange Wild, it dies in combat to everything it can actually block and even just ties some of the ambush airborne champions. In talking with John Tatian (or one of the other members of “The Flock” or “The Lads”), he talked about how Medusa in response to a turn one Raging T-Rex was too weak a play. Essentially, if the Evil deck tries just to keep up with the Wild deck, it can’t, so it will run out of cards sooner and die. A draw 2 is almost always better in that situation because it moves you closer to your Gifts and Zannos, and it can also set up an on-turn Scara’s Will or even just The Gudgeon/Owl Familiar chump block. It can’t even break Brak, Fist of Lashnok the turn it is played, and Medusa is an even weaker play when your opponent’s gold is still up. Pretty terrible against Human tokens too.
At this point in the meta, Medusa seems like it is only reasonable at maintaining an established lead against Wild, which admittedly still has some value. An extra 6/8 attacker on a board overrun by your tokens can speed up your clock against your opponent, and/or help get an extra token attack through unblocked though. But, even as a response to an evasive blitz champion, it is generally worse than Erase (except against Strafing Dragon), and it isn’t that much better than Wave of Transformation, Zombie Apocalypse, Demonic Uprising, or a chump blocking Guilt Demon. If you are specifically trying to improve your chances against the mirror and/or Human tokens, you might consider cutting them.
 Wave of Transformation, non-Evil, 1-cost answer for literally anything your opponent can do, or a draw 2. It can be punished by Demonic Rising, Rise of the Many, or Wolf’s call though.
Erase, excellent “Draw 2 And” that deals with all but untargetable-blitz champions while you draw into your critical cards.
Hasty Retreat is the 0-cost oh-crap version of Erase. Also a non-Evil “Or Draw 2.” It is particularly strong against decks with buffs/breakthrough that can get a lot of essentially unblockable damage through otherwise, namely the Wild Combat Tricks list Pluck U, including myself, ran at Worlds 2018.
 Draka’s Fire is “The Lads” tech spice specifically included to break the Evil Scara’s Gift mirror. In their testing, they came to the conclusion that this was the clear best deck (I’m still not 100% sold), and that Rift Summoner was one of the strongest cards in the matchup. This card answers Rift Summoner quite well, and since at least half the field was playing various forms of Scara’s Gift, they absolutely made the right call to include it (although, to be fair, about half of that half was all but one of “The Lads” running this deck). Draka’s Fire also unexpectedly broke my back in my final Royal Escort protected Justice Prevails wolf token assault against Hampus in the quarter finals.
Flash Fire fills the 0-cost slot created by the double Draka’s Fire. Great against specifically token decks, but also great at neutralizing an opponent who gets out too far ahead in zombies. In addition to breaking Muse/Plucker.
Remaining 0-Costs


Guilt Demon is strong for targeted removal of discard pile cards like Smash and Burn. It is a decent threat, and it is strong as an ambush airborne chump blocker when needed. Finally, it’s the best way to slow down Gift if unanswered, since it provides repeatable discard pile banishment that can prevent the two card banish requirement on Gift’s recall.
Plentiful Dead is a permanently recallable chump blocker, downgrading big, unexpected, non-evasive attacks into a 1-health tax. It can get you incrementally further ahead on the board, but this deck doesn’t want to trade too much health to do that, hence why it is a one-of.
Heinous Feast, another “Or Draw 2” although it does not trigger Gift. It can gain significant health against champion based decks that don’t do much with their discard pile, and/or it can turn off recycle for you opponent at a devastating moment. Nice to suppress potential Army of the Apocalypse decks too.
Amnesia, a 4th Heinous Feast trading the more desirable Health gain and loyalty alignment for the less desirable recycle.
 Owl Familiar is “The Lads” other major spice. It’s an extra copy of your situationally best, unbanished, 1-cost event that you played this game (and can immediately play again), attached to a slow airborne chump blocker with no immediate loss in handsize. Airborne chump blockers are incredibly valuable; I cannot overstate that. They can prevent a lot of damage from airborne gold punishers (except Draka), and an extra turn’s respite is huge.
Further, in most matchups there’s an event or two which is great at stonewalling your opponent. Against a hyper-aggressive Wild deck, extra Drain Essence. Big slow guys like Brak or Brach, Scara’s Will. Single major unbreakable threats (Force Lance), Erase. Distributed unbreakable threats (Insurgency), Wave of Transformation. Rift Summoners, Draka’s Fire. Or, if you just need to draw more cards with a slight upside, Ancient Chant/Dirge of Scara (to trigger their “When this leaves your discard pile” trigger). Although, if you can’t get an Event back with it, and you’re pressured so much you have to play it just as a chump blocker, particularly in the early game, *wince*.
Absorb then Unleash (Playstyle)
This deck does not follow Get Ahead, Stay Ahead exactly. I learned this watching John Tatian’s matches with “The Flock’s” original list in the 2017 Worlds finals. (My first exposure to this playstyle was Derek Arnold’s 5 color control deck.) Instead, a more apt way to describe the playstyle needed to play this deck optimally is “Absorb then Unleash.”
The biggest differences between “Absorb then Unleash” and “Get Ahead/Stay Ahead” is that as “Absorb then Unleash” you are neither trying to Get Ahead on the board early, nor is it always necessary to Stay Ahead later. Instead, your goal is to Absorb the loss of early game board presence and small amounts of health, in order to gather your strength (by drawing up to 7 and to your critical cards), and then unleash it either as one big game winning burst or an overwhelming stream of pressure.
To achieve this, you almost always want to start by spending your first gold to draw cards. From there, you’ll focus on Absorbing your opponent’s early turns by playing 0s and individual 1-cost cards that can blunt more than just a single 1-cost card played by your opponent (since you have to deal with their early board advantage, in addition to what they are throwing at your now) in order to find any opportunities to safely fit in additional card draw (even if that means letting them get further ahead on the board, as long as this doesn’t directly translate into you taking large amounts of damage). Frequently this means drawing on your turn, while you can’t be attacked, and/or drawing after your opponent spent their gold on a not-immediately-threatening card. This continues until either A) your opponent runs out of cards and you can just walk over them, or B) you find and Unleash your win condition(s).
Draw Cards Early and Often
 Any time you want to draw cards, such as with your first gold of the game or after you incidentally Absorb an opponent’s gold for a turn, you need to choose which card to use. If you have one of your “Draw 2 And”s that can only ever draw cards (The Gudgeon, Dirge of Scara, or Ancient Chant), use that. If not, and you only have one card in your hand that can draw 2, use that. If neither or those are true, deciding which card to use as a draw 2 requires a bit more thought and depends on the current state of the game and what your opponent’s deck is doing.
 Early game, the best “Or Draw 2″s to use are your mid/late-game and/or win-condition cards, namely Heinous Feast, Amnesia, Demonic Rising. You’re a long way from being able to use these for their alternate effect, so pitch them to get more immediately relevant cards. You’ll eventually find replacements for them when you can actually make use of them.
If you don’t know what your opponent’s deck is doing, Dark One’s Fury is the next card I recommend pitching; against other Evil decks, it will never be anything more than a draw 2 anyway, and you generally don’t actually want to use a board clear until a few turns into the game. Duplicates are next. We want options so we can deal with the variety of things our opponent might throw at us; therefore, if you’re sitting on two of the same card, pitch one to preserve a single copy of your others.
Finally, we arrive at the cards I’m loathe to pitch early: Scara’s Will, Erase, Wave of Transformation, Raxxa’s Curse, Flash Fire, Hasty Retreat (going in order with Hasty Retreat being the card I least want to use). Scarra’s Will is strong in the early game because an opponent opening with a single strong establishing champion (like Raging T-Rex) is fairly common. Being able to answer that, then draw cards with a different Evil card is great. Erase is similar, except you also get to draw cards when you play it; however, it is much better to save for answering non-establishing, aggressive/blitz champions. Wave of Transformation being able to answer literally anything your opponent can throw at you makes it a strong safety net to keep. The rest are all 0-cost cards that can be played in conjunction with other card draw.
Once you know the deck archetype of your opponent, you can have a better idea of what you need to keep. Against
- Wild Midrange: Amnesia and Heinous Feast aren’t necessary, but Scara’s Will is particularly strong. One of Wave of Transformation, Zombie Apocalypse, or Demonic Rising can be held just in case the board gets out of control, but you’re generally aiming to clear with Dark One’s Fury if you have a board or Angel of Death if you don’t. If vs the Force Lance version, preserve your Erases and Waves.
- Mirror (Another Scara’s Gift deck): Keep Heinous Feast and Amnesia until you can hit a big discard pile or immediately after your opponent’s first gift recall. Flash Fire is strong. The rest aren’t great.
- Human Tokens: Keep your Flash Fire, Wave of Transformations, Zombie Apocalypse, and Raxxa’s Curses (Paros Rebel Leader) everything else is expendable draw fodder.
Against any non-token deck, Demonic Uprising is a strong card to hold onto from mid-game onwards. It can be an immediate surprise lethal if your opponent spends their gold first on your turn.
Absorb
 The best way to Absorb your opponent’s pressure is to deflect non-evasive champions with 0-cost/incidental, chump blocking champions, in order to force your opponent to commit more gold to the board, for you to wipe them all away with a single 1-cost board clear. Owl Familiar, Plentiful Dead, Raxxa’s Curse, Dirge of Scara, and The Gudgeon are all great at that. They buy you time until you can find Zannos Corpse Lord/Rift Summoner to do it better. (For 1 gold, either of those cards are able to generate plenty of expendable 0-cost champions to block multiple big champions over multiple turns.) Drawing these two is generally what shifts us into the Unleash stage.
If you’re able to use 0s or 1-gold from two turns ago to prevent your opponent’s next gold (or more) from dealing any damage, that is one (or more) free opportunities to draw cards. Once your opponent has finally built up a strong enough board to bypass your defenses, and you’ve had multiple opportunities to draw cards, you can use one of your board clears (ideally Angel of Death) to clear out all of their progress and start the cycle again.
Another way to absorb your opponent’s attacks is to let some through. You start with 30 health, and as long as you don’t hit 0, you’re fine. So, for example, if your opponent spends their gold just to attack for 9 or less damage and your only off-turn play is Zombie Apocalypse, it will almost always be better just to take the hit and then follow up with Zombie Apoc to draw 2. This will generally increase your available off-turn plays for next turn, preventing you from just folding to your opponent, and it will draw you closer to both better answers (Drain Essence) and your critical cards (Zannos/Gift). Further, when you do play that Drain Essence, not only will it remove a threatening champion, but it will also remove that damage you took while drawing to it. The only caveat to this is that as you approach 10 health, you start to become vulnerable to potentially losing to a 1-cost Burn spell (Flame Strike) + a 0-cost Burn Spell (Fireball). Until then, your health is a resource, utilize it.
Unleash
Unlike more combo-centric decks, this one frequently doesn’t Unleash dramatically. Instead, after it finds its key cards and gets up to 7 in hand, it shifts into a more focused form of Get Ahead, Stay Ahead centered around Zannos/Rift Summoner and Gift.
Mid to late game, Zannos (now with a 6+ reveal) and Rift Summoner are your threats (while also being your best absorption tools). Ideally, you always want at least one of those (with their army) on board to attack with and a back up in hand in case your board gets cleared. All of your other cards support this goal now, while Gift simultaneously does its thing; although, you’ll almost always want to save your gold until after your opponent spends theirs. The main difference in this Unleash state is that you no longer need to use almost all of your safe golds, that you continue to generate through Absorption, to draw cards. That being said, if you don’t have a backup Zannos/Rift Summoner in hand, you’ll generally still want to spend those safe golds to draw cards to find one.
Otherwise, this is when Medusa, Steed of Zaltessa, Dark One’s Fury/Draka’s Fire, and Demonic Rising shine. (Angel of Death, Zombie Apocalypse, and to a lesser extent Wave of Transformation fall off a bit since you have a valuable board.) With 7 cards in hand and an already threatening board, spending one card on Medusa to clear off a threat while meaningfully increasing your own threat is pretty reasonable. Steed of Zaltessa is a solid on-turn gold-punisher; it significantly speeds up your clock on your opponent as they scramble to spend their gold first to stay alive against your board. Dark One’s Fury and Draka’s Fire are similarly on-turn gold-punishers but instead take advantage of your existing board to get damage through your opponent’s now empty board. (Great at clearing out ambush blockers.) Demonic Uprising your 7-reveal Zannos board and you get 32/32 worth of blitzing demons. <- That’s the explosive part of your unleash.
**Important to remember though, unless you are killing your opponent or doing something necessary to survive, the best thing you can do in response to your board getting cleared is to play a new Zannos on-turn or Rift Summoner off-turn as your gold-punish.**
Other Card Considerations
The Flock’s original list was:
(Evil) -1 Zannos, -1 Rift Summoner, -1 Dark One’s Fury, -1 Steed of Zaltessa | +2 Reaper, +1 Zombie Apocalypse, +1 Apocalypse
(Sage) -2 Owl Familiar | +2 Hasty Retreat
(Wild) -2 Draka’s Fire | +2 Surprise Attack
Some of The Lads ran -1 Zannos for +1 Reaper.
I believe I saw someone running at least 1 Necromancer Lord at Origins.
After testing, The Lads were also considering Raxxa, Demon Tyrant, in addition to trading out some cards for some of the other options above. See their article for explanation.
If I were to run it, I’d probably -1 Draka’s Fire +1 Surprise Attack and -1 Steed of Zaltessa -1 Medusa for some jank. (Although I’d be much more likely to run the more aggressive Zannos-focused non-Gift midrange combo deck with Kriegs, Murderous Necromancers, and Mist Guide Heralds I was messing around with a bit on stream.)
Weaknesses
 The second biggest weakness for this deck is its lack of early game consistency. While it is built to absorb early game pressure, it can only take so much before dying. It relies on drawing Scara’s Gift to offset the inevitable damage that gets through and to close out games, and it basically needs a Zannos or a Rift Summoner to get damage through. Adding in Angel of Death as another incredibly strong card to draw early, that is literally only 12 cards of your 60 card deck. If you don’t draw these cards early, Midrange will crush you before you can stablize. Further, if you don’t draw enough of them, or your Gift is severly delayed, or you don’t draw any Draw 2s you’ll still probably lose to midrange. In my testing, the Wild midrange deck was favored over this.
Draw too many generic draw 2’s and aggro can occasionally beat you, although I think you’re favored pretty highly. (I didn’t test Wild aggro specifically against this.) Against human tokens, if you don’t draw at least one Wither/Flash Fire and/or some off-turn board clears, you’re probably dead (although a turn one 4-reveal Zannos is pretty hard for human tokens to beat). In my testing, I thought the matchup against human tokens was fairly even, but I didn’t test it nearly enough out of mental fatigue.
And, that brings us to the biggest weakness of this deck. It is a draining deck to play. You need to carefully assess just how much damage you can take in order to draw cards. You need to carefully choose which cards you can use to draw with and when. Determining when you can attack and when you have to defend is challenging as well. As is determining when you can spend your gold first in the early game. All of this is then ramped up to insane levels in the mirror match when both players draw Gift. According to Nathan in The Lad’s article, the Gift-draw mirror is “a two hour slog full of micro-decisions that becomes very taxing over the course of a tournament.”
 This is not a deck I would recommend to new players (that would be the Wild Midrange deck which I believe is favored against this). However, it is imperative to understand how this deck plays; it is very difficult to both build a deck that can beat this and to correctly play that deck in order to actually win. I highly recommend watching John Tatian’s finals match where he outplays Sam Black on the Wild Midrange deck. The other matches with this deck all also probably quite valuable to watch. (I just haven’t gotten around to it yet myself.)
Conclusion
Overall, this is a deck that wants to Absorb the early game pressure in order to draw into their key cards of Gift of Scara, Zannos Corpse Lord, and Rift Summoner. From there, they want to Unleash their chip damage by maintaining a reasonable board for both launching attacks and deflecting attacks, with the threat of big swings all while Gift steadily drains away.