Still Here! (Time-Intensive Video In Progress)

Hey, it’s been awhile since my last post, and I just wanted to reassure everyone that more content is on the way. I’ve been working on my top tier constructed video for awhile, and I just keep deciding to push it further and further because it just wasn’t good enough yet. (Started recording it with only an outline, but the language wasn’t tight enough, it was too repetitive, and I kept leaving out points I wanted to touch on, [similar to how I felt about my first video on my Priest of Gold Dragon deck] so I started working on a script.)

While starting Monday I’ll have less hours I can commit to it, the script is really tightening up which is giving me the energy to get my momentum rolling again. Looking forward to getting it out, but it probably won’t be done before the end of next week, if not later, hence this post.

When finished, I’ll post about it in the usual places, but if you want to make sure you see every post (including ones like these that I don’t cross post), you can subscribe for updates by email. (It only sends emails when I publish something new.)

Epic Worlds Trip Booked!

I have finally booked my flight for Epic Worlds 2017 from Nov 18-Nov 20, getting in Thursday, 16th night. I’ve even begun testing decks, and I’ve discovered a new one that I love. We’ll see how it holds up when we find out what the formats and legal sets will be for Worlds though. Looking forward to seeing everyone who is going to be there. With only 2 more full weeks until the event, I might not get any more major posts up before then, since I’ll be practicing/testing, but I’ll have plenty to talk about when Worlds is over.

Showmatch Raw Footage Posted

Yesterday, World Champion John Tatian and I finished our Best of Seven First Encounter Showmatch. It was a lot of fun, and we had quite a few games that were Epic in every way: close, exciting, and long.

So far we have my raw stream footage uploaded to Youtube, John’s raw stream footage can be seen on his blog, and both streams can be watched simultaneously with commentary from cnoz + CJ Moynihan.

My Stream: Part 1, Part 2
John’s Stream
cnoz + CJ’s stream (audio starts at 47:00)

Edited videos are planned as well.


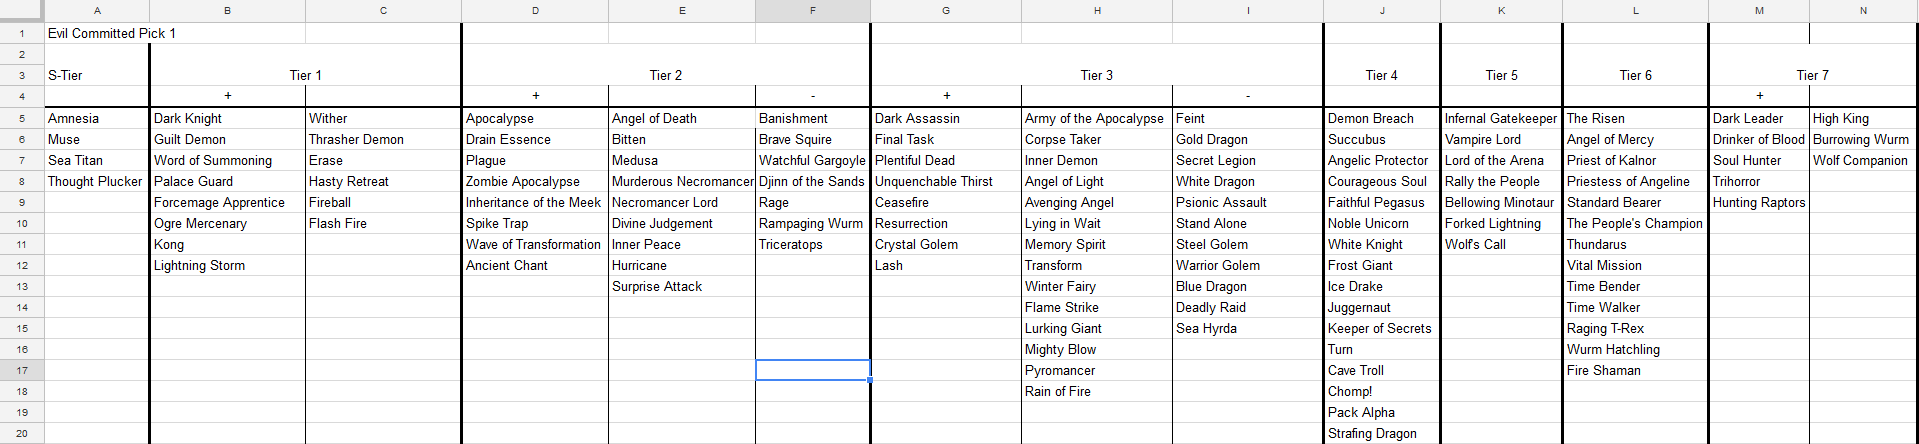
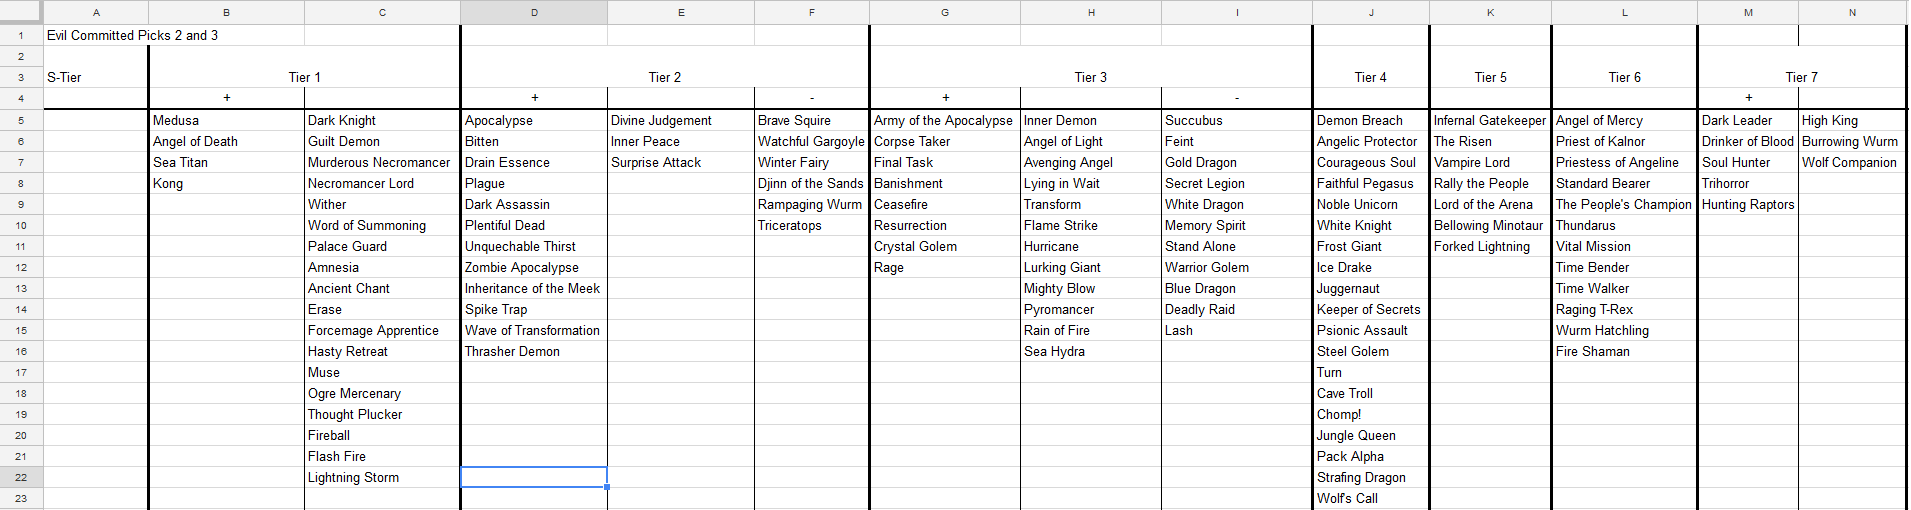
Core Tier Charts (Wild Update)

I have updated my Dark Draft, Core-Only, Tier Charts article to include my Wild tier charts, included below. Check out the main article for explanations on when and why I draft specific alignments.

Wild Commitment Pick 1 Chart

Searchable Spreadsheet

(Click picture for full size)

Wild Commitment Pick 2/3 Chart

Searchable Spreadsheet

(Click picture for full size)

Core Tier Charts (Sage Update)

I have updated my Dark Draft, Core-Only, Tier Charts article to include my Sage tier charts, included below. Check out the main article for explanations on when and why I draft specific alignments.

Sage Commitment Pick 1 Chart

Searchable Spreadsheet

(Click picture for full size)

Sage Commitment Pick 2/3 Chart

Searchable Spreadsheet

(Click picture for full size)

Transparency Update

As a matter of transparency, I have updated my “Subscribe to Blog Via Email” text to read: “At least 1 post per week (frequently 2 or 3): Primarily Epic Card Game strategy articles. Game reviews and other game-related posts are possible as well.” As opposed to “Approximately 3 posts per week: strategy articles (frequently Epic Card Game), game reviews, and other game-related posts.”

At this point, new content will primarily focus on Epic related topics (at least for now), and these articles generally tend to take longer to write. By going down to “at minimum 1 post per week,” I should be able to more easily and consistently produce high-quality articles without the need to count short announcements like these to artificially reach the 3 posts per week goal. (This also frees up a bit more time to stream and work on learning video editing. On that point, expect a big announcement in the next few days.)

Dark Draft, Core-Only, Tier Charts

Foreword

Now that I have had a significant amount of time to play a bunch of core-only dark drafts, I have updated my ratings. If you want even more dark draft content, check out my main dark draft article.

Tier Charts Explanation

Instead of my overall ranking scheme ranging from Always First Picakable…Situationally Desirable…Rarely Playable, I have broken down the cards by tier based on overall power level and how highly I value them. In addition, due to the dramatically shifting value of cards throughout a dark draft, I have decided to create 9 tier charts:

  1. Pack 1 Pick 1/Uncommitted Chart
  2. Evil Committed Charts
    1. Pick 1
    2. Pick 2/3
  3. Good Committed Charts
    1. Pick 1
    2. Pick 2/3
  4. Sage Committed Charts
    1. Pick 1
    2. Pick 2/3
  5. Wild Committed Charts
    1. Pick 1
    2. Pick 2/3

Every draft begins with the Pack 1 Pick 1/Uncommitted Chart. Once you have decided to commit to an alignment, you then switch to that alignment’s charts and ignore the other charts.

Cards within a tier (S-Tier, Tier 1, Tier 2, Tier 3, Tier 4, Tier 5, Tier 6, Tier 7) are roughly equivalent in power. Inner-tier differences are minor and vary based on other cards in the pack and my mood that draft.

Finally, some tiers have multiple columns. For instance, Tier 1 has a neutral column and a ‘-‘ column. Cards in the ‘-‘ column are a bit weaker than cards in the neutral column. Tier 3 has a ‘+’ column, neutral column, and ‘-‘ column. Cards in the ‘+’ column are a bit stronger than the neutral column, and cards in the ‘-‘ column are a bit weaker.

Brief Reasoning Behind My Changes

Below I touch on why some of my card ratings are different here than in my main article.

Burn/Health Gain

In Core only, there is a higher concentration of burn cards than in any other format. Due to this, it is much easier to assemble a large amount of burn. Against unprepared opponents, this can be very strong; however, burn can also be fairly easy to counter with cards like Inner Peace. Therefore, the worthwhile health gain cards are fairly high on my list.

0-Cost Champions (Blitzers)

0-cost champions like Dark Knight, Guilt Demon, and Thrasher Demon are even harder to effectively answer in core-only than they are in other formats. This makes them some of the best cards to create early pressure without committing your gold. Recycle 0-cost cards work in a similar way: they let you develop a threat while neither committing your gold nor losing a card in hand. Therefore, all of these cards are tier 1 cards.

In other words, these are frequently the best cards to play to get ahead, since they allow you to hold your gold and use it to stay ahead. They take the place of 1-cost establishing champions allowing you to more aggressively use powerful gold-punishers.

Evil

Due to the greater value I place on Evil’s 0-cost blitzers, I am more likely to be able to support Evil Loyalty 2 cards now. This makes going Evil less risky than it was for me in the past. In addition, Evil has the absolute best rewards for committing to it…hmmm, thematically interesting.

Pack 1 Pick 1/Uncommitted Chart

Since this is the Pack 1 Pick 1 chart, I attempted to organize all of the cards in a tier from my first pick in that tier to my last pick. That being said, the cards are so similar in strength that choosing between them is largely a matter of personal preference. Further, as you get deeper into a draft, these intra-tier rankings break down quite quickly based on what you have already drafted and what you still need.

Searchable Spreadsheet

(Click picture for full size)

Alignment Committed Charts

Once I commit to an alignment, my valuation of certain cards change. Primarily, powerful in-alignment Loyalty 2 and Ally effect cards dramatically increase in value, while off-alignment Loyalty 2 and Ally effect cards drop in value. In addition, certain off-alignment cards change value because they either work well with that alignment (Ancient Chant in Evil) or work poorly with that alignment (Inner Peace in Pick 2/3 Wild).

Differences Between Pick 1 and Pick 2/3 Charts

I love to counter draft. This can either involve drafting cards to counter what your opponent is doing (taking Flash Fire to stop a Courageous Soul->Secret Legion strategy), or it can involve drafting cards your opponent would like to draft. For these tier charts, I am focusing on the latter.

The primary reason there is a difference between my Pick 1 and Pick 2/3 charts is I firmly believe in taking the best overall card in a pack as opposed to the best card for my deck, in pick 1 (most of the time). For example, say we are drafting an Evil-Alignment deck and get the pack above. Angel of Death is the best card for my deck because it is a board clear that leaves behind a 6/5 airborne body. Generically however, Palace Guard is the best card with Divine Judgement being strong as well. (Burrowing Wurm and Dark Leader are bad.)

If I take Angel of Death, my opponent easily takes Palace Guard and Divine Judgement. I get 1 amazing card for my deck and my opponent gets 2 great cards for theirs. Instead, I would usually take the Palace Guard here. This leaves my opponent with a snap pick Divine Judgement, and unless they are also going Evil (which is unlikely if I am going Evil), they have a choice between 3 bad cards for their deck. In this scenario, I get 1 very strong card, and my opponent gets 1 strong card and 1 weak card. I much prefer this second outcome.

In Pick 2/3 of a pack, since my opponent can’t get any of the cards I don’t take, I can freely take the strongest cards for my deck.

Evil Committed Charts

In addition to the usual adjustments for Loyalty 2 and Ally effect cards, Ancient Chant, Winter Fairy, and Djinn of the Sands move up a tier in Evil. This is due to the fact that Evil has no “draw 2 and” cards in Core only, and their draw overall is weak.

If you notice any other cards that changed tiers that you don’t understand/agree with, feel free to ask me about it in the comments below, and I will go into more detail about those cards.

When/Why I Commit To Evil

I commit to Evil when I draft a Medusa, Murderous Necromancer, or Necromancer Lord, usually in pick 2/3 of a pack, preferably by pack 4ish. These are 3 of the most powerful cards in core set only.

If I see that my opponent passes me one of these cards early in a draft, that is a pretty large signal that they are not going Evil, and I am immediately rewarded for going Evil. Even if my opponent tries to deny me Evil cards for the rest of the draft, I have plenty of time to gain enough Evil cards to be able to hit my loyalty effect(s) reliably. In addition, if my opponent doesn’t also try to draft Evil, cards like Necromancer Lord, Angel of Death, Murderous Necromancer, Dark Assassin, and Plentiful Dead are nearly worthless to them so they are more likely to be passed to me.

Pick 1

Searchable Spreadsheet

(Click picture for full size)

Pick 2/3

Searchable Spreadsheet

(Click picture for full size)

Good Committed Chart

In addition to the usual adjustments for Loyalty 2 and Ally effect cards, card draw effects are slightly reduced in tier (for example Ancient Chant and Winter Fairy) due to incredibly powerful Good cards with draw effects like Noble Unicorn and White Knight.

If you notice any other cards that changed tiers that you don’t understand/agree with, feel free to ask me about it in the comments below, and I will go into more detail about those cards.

When/Why I Commit To Good

I don’t commit to Good often in draft. This is partially because, unlike Evil, there are no Good Loyalty 2/Ally cards that are strong enough to get me to commit to Good by themselves. Instead, to commit to Good I must have already incidentally drafted 2+ overall decent Good cards (Noble Unicorn, White Knight, Angel of Light), and then get passed a strong commitment reward card like Angel of Mercy or High King for a pick 2/3.

Good is a risky alignment to draft, particularly in Core Only. This is because so many of their best cards (Noble Unicorn, White Knight, and Angel of Light) are strong enough in a non-Good deck that your opponent could counter draft them or just incidentally take them without much downside.

Pick 1

Searchable Spreadsheet

(Click picture for full size)

Pick 2/3

Searchable Spreadsheet

(Click picture for full size)

Sage Committed Chart

In addition to the usual adjustments for Loyalty 2 and Ally effect cards, generic draw 2 cards are slightly decreased in value since Sage has great drawing cards. Board clears are slightly increased in Pick 1 Sage because counter-drafting board clears helps to protect your big untargetable champions, namely Steel Golem. There are also a few other small differences between charts. For example, Ancient Chant is higher in Pick 1 chart because Psionic Assault is strong in a Sage deck, and Ancient Chant almost completely negates Psionic Assault. Avenging Angel is also higher than usual because with the forced discard and control in Sage, Avenging Angel is frequently harder for your opponent to effectively remove while staying competitive in other aspects of the game.

If you notice any other cards that changed tiers that you don’t understand/agree with, feel free to ask me about it in the comments below, and I will go into more detail about those cards.

When/Why I Commit To Sage

I have not been committing to Sage often in Core only. The main reason for this is, while Sage has all 4 of the S-Tier cards Amnesia, Sea Titan, Thought Plucker, and Muse in addition to Ogre Mercenary, Erase, etc., the Sage commitment cards aren’t as overwhelmingly powerful as other alignments. Committing to Sage also doesn’t dramatically increase the draftable card pool for you, unlike Evil and Good.

Generally, I commit to Sage when I’m midway or further through the draft, I haven’t committed to a different alignment, I have already drafted a decent number of generic Sage cards, and I come across cards like Steel Golem, Psionic Assault, Juggernaut, Time Walker, Ice Drake, or Warrior Golem. However, since only Time Walker among these is terrible without Loyalty or a plethora of ally triggers, I occasionally shift my alignment commitment later in the draft if I come across powerful non-Sage alignment cards that I can support. For instance, if it is pack 8 and I come across Medusa while I have 8ish other incidental Evil cards, there is a decent chance I take Medusa and focus on supporting Evil going forward.

Pick 1

Searchable Spreadsheet

(Click picture for full size)

Pick 2/3

Searchable Spreadsheet

(Click picture for full size)

Wild Committed Chart

In addition to the usual adjustments for Loyalty 2 and Ally effect cards, Wild’s card evaluations are heavily based around their goal of burning out your opponent, particularly in Core-Only. Strafing Dragon and Hunting Raptors are rewards for going Wild, and they help you reach a critical mass of burn at the same time. The more burn you have, the stronger it becomes (to an extent) since you can kill your opponent fromĀ  a higher health total without having to get as much attack damage through.

Due to this burn-slanted evaluation, health gain is a high-priority counter-draft in pick 1, but it drops off significantly in pick 2/3. Not only do you not need to counter-draft health gain pick 2/3, but if you draft most of the burn and deny it to your opponent, health gain is significantly less valuable. I also value board clears a bit less in Wild because a significant amount of Wild’s damage doesn’t rely on maintaining champions in play.

If you notice any other cards that changed tiers that you don’t understand/agree with, feel free to ask me about it in the comments below, and I will go into more detail about those cards.

When/Why I Commit To Wild

I practically never go Wild in Core-Only. I feel like Wild can be incredibly devastating against opponents that don’t prepare for the burn kill, but I think countering the burn kill isn’t that hard to do. Drafting Inner Peace can make a burn out victory nearly impossible, and a well-timed Drain Essence can give a player enough time to out-race burn.

That being said, Raging T-Rex is absolutely incredible. If I get passed T-Rex when I haven’t already committed to a faction, I get very tempted.

Pick 1

Searchable Spreadsheet

(Click picture for full size)

Pick 2/3

Searchable Spreadsheet

(Click picture for full size)

Conclusion

I still need to create charts for Good, Sage, and Wild, but feel free to ask for clarification/ask questions on anything I have included so far in the comments below. Always happy to answer Epic questions.